
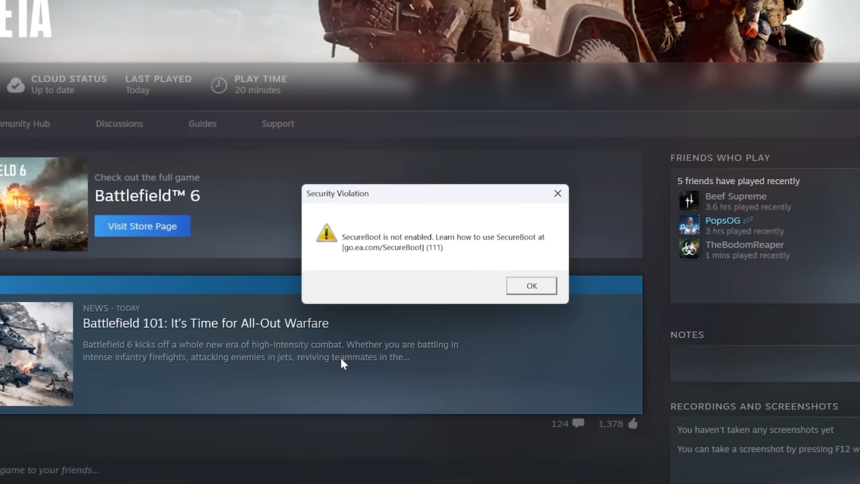
If you’re trying to launch Battlefield 6 and encounter an error related to Secure Boot, don’t worry — this issue is common and can be fixed easily by adjusting your BIOS settings. The error occurs because Battlefield 6’s new anti-cheat system requires Secure Boot to be enabled. This ensures that your system only runs trusted software during startup, protecting the game from kernel-level hacks and cheats.
Below, you’ll find a comprehensive step-by-step guide to check your Secure Boot status and enable it correctly.
1. Check if Your PC Supports Secure Boot
Before enabling Secure Boot, verify that your computer meets the requirements.
- Press Windows + R on your keyboard to open the Run dialogue box.
- Type msinfo32 and hit Enter. This opens the System Information window.
- Look for the field labelled BIOS Mode.
- It must specify UEFI for Secure Boot to function properly.
- If it says Legacy, you’ll need to reinstall Windows in UEFI mode or convert your drive to GPT (explained later).
- Find Secure Boot State in the same window.
- If it says ON, Secure Boot is already active.
- If it says OFF, you’ll need to enable it.
- If it says Unsupported, your hardware or BIOS may not support Secure Boot.
2. Enter the BIOS or UEFI Settings
To enable Secure Boot, you’ll need to access your BIOS or UEFI firmware interface.
- Restart your PC.
- As soon as it starts booting, press the correct key repeatedly — usually Delete, F2, F10, or Esc (the key varies by manufacturer).
- Once inside the BIOS, use your keyboard or mouse to navigate to the Boot, Security, or Authentication tab.
3. Enable UEFI Boot Mode
If the Secure Boot option is greyed out, your system may still be using Legacy Boot or CSM (Compatibility Support Module).
- Locate Boot Mode, CSM Support, or Legacy Boot in the Boot tab.
- Set Boot Mode to UEFI Only or UEFI First.
- Disable Legacy Boot or CSM if enabled.
- Save the changes and reboot your computer. Then, re-enter the BIOS.
4. Enable Secure Boot
Once UEFI mode is confirmed:
- Return to the Boot or Security tab.
- Find Secure Boot and set it to Enabled.
- On some motherboards (like ASUS or Gigabyte), you may need to Restore Factory Keys before you can enable it. You’ll find this under the Secure Boot section.
- Press F10 or select Save & Exit to apply your changes and restart your computer.
5. Check Drive Partition Format (GPT vs. MBR)
Secure Boot requires your main system drive to use the GPT (GUID Partition Table) format, not the MBR (Master Boot Record) format.
To verify:
- Open the Run box again and type diskmgmt.msc to open Disk Management.
- Right-click your primary drive (the one with Windows installed) and select Properties.
- Go to the Volumes tab and check Partition Style.
- If it says GPT, you’re good to go.
- If it says MBR, you’ll need to convert it to GPT.
To convert to GPT without reinstalling Windows, use Microsoft’s tool:
- Open Command Prompt as Administrator.
- Type:
mbr2gpt /convert /allowfullosand press Enter.
- Once complete, restart your PC and re-enter the BIOS to enable Secure Boot.
6. Reboot and Launch Battlefield 6
After enabling Secure Boot and confirming your drive setup:
- Save all BIOS settings and restart your PC.
- Boot into Windows normally.
- Try launching Battlefield 6 again — the Secure Boot error should now be gone.
Additional Tips
- If your BIOS interface appears differently, refer to your motherboard’s user manual or the manufacturer’s website for specific instructions.
- Some systems require enabling TPM (Trusted Platform Module) alongside Secure Boot for certain games or anti-cheat systems. You can usually find this option under Security → TPM Settings or Trusted Computing.
- Keep your BIOS firmware updated to avoid compatibility issues, as older versions may not fully support Secure Boot functionality.
Once Secure Boot is enabled, your system is more secure against low-level attacks, and Battlefield 6 should run without any launch errors. You’re now ready to jump into the action, knowing your setup meets EA’s latest security standards.


