
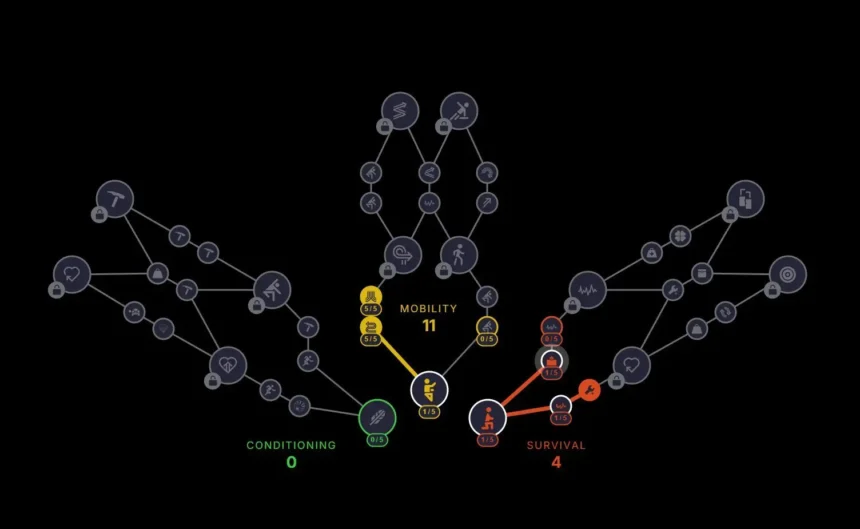
In Arc Raiders, survival is dictated by efficiency. Every sprint, vault, dodge, and reload drains stamina, and the wrong skill choices can leave you exposed at the worst possible moment. With 45 skills spread across Conditioning, Mobility, and Survival, understanding which ones provide real, repeatable value is essential.
This tier list ranks every skill based on how much it improves uptime, movement efficiency, survivability, and looting safety during real gameplay scenarios—not just theorycrafting.
How the Skill Tiers Work
| Tier | Meaning |
|---|---|
| S Tier | Mandatory picks. Always valuable regardless of build or playstyle. |
| A Tier | Strong and reliable, best when paired with the right gear or tactics. |
| B Tier | Situational or niche; useful only in specific scenarios or builds. |
S Tier Skills (Must-Have)
These skills directly enhance stamina management, mobility, and loot efficiency. They are effective in almost every run.
| Skill | Category | Effect | Why It’s S Tier |
|---|---|---|---|
| Fight or Flight | Conditioning | Regain stamina when hurt in combat | Keeps you mobile during sustained firefights |
| Survivor’s Stamina | Conditioning | Faster stamina regen when critically hurt | Strong synergy with Fight or Flight |
| Effortless Swing | Conditioning | Melee abilities cost less stamina | Core for melee and hybrid builds |
| Loaded Arms | Conditioning | Weapons add less encumbrance | Maintains speed with heavy gear |
| Back on Your Feet | Conditioning | Health regenerates to a cap when critical | Enables clutch survivals |
| Marathon Runner | Mobility | Movement costs less stamina | Universal efficiency boost |
| Youthful Lungs | Mobility | Increases max stamina | Benefits every action |
| Broad Shoulders | Survival | Increased carry weight | Essential for loot-heavy runs |
| Security Breach | Survival | Access high-value lockers | Directly improves progression |
| In-Round Crafting | Survival | Enables field crafting topside | Critical adaptability |
| Stubborn Mule | Survival | Over-encumbrance affects stamina less | Huge value for heavy builds |
A Tier Skills (Strong and Reliable)
Excellent picks that shine with the right setup, environment, or playstyle.
| Skill | Category | Effect | Value |
|---|---|---|---|
| Proficient Pryer | Conditioning | Faster breaching | Reduces loot exposure |
| Effortless Roll | Mobility | Dodge rolls cost less stamina | Improves combat survivability |
| Carry the Momentum | Mobility | Free sprint after dodge roll | Enables evasive chaining |
| Vigorous Vaulter | Mobility | Vaulting not slowed when exhausted | Helps vertical traversal |
| Heroic Leap | Mobility | Dodge roll travels farther | Strong repositioning |
| Calming Stroll | Mobility | Stamina regenerates while walking | Long-distance sustain |
| Minesweeper | Survival | Defuse nearby explosives | High PvPvE value |
| Good as New | Survival | Faster stamina regen while healing | Mid-fight sustain |
| Three Deep Breaths | Survival | Faster stamina recovery after abilities | Ability-heavy builds |
| Revitalizing Squat | Survival | Faster stamina regen while crouched | Stealth synergy |
| Silent Scavenger | Survival | Less noise while looting | Stealth advantage |
| Traveling Tinkerer | Survival | More field-craft options | Tactical flexibility |
| Looter’s Instinct | Survival | Faster loot reveal | Less time exposed |
| Ready to Roll | Mobility | Longer fall recovery window | Prevents accidents |
| Off the Wall | Mobility | Increased wall leap distance | Advanced traversal |
| Vault Spring | Mobility | Jump after vaulting | Minor mobility boost |
| Nimble Climber | Mobility | Faster climbing and vaulting | Efficiency gain |
| Slip and Slide | Mobility | Longer, faster slides | Quality-of-life |
| Used to the Weight | Conditioning | Shields slow you less | Shield builds |
B Tier Skills (Situational)
Useful only in niche scenarios or very specific builds.
| Skill | Category | Effect | Limitation |
|---|---|---|---|
| Unburdened Roll | Conditioning | Free dodge after shield break | Only shield-focused |
| A Little Extra | Conditioning | Breaching restores resources | Minor sustain |
| Sky-Clearing Swing | Conditioning | Bonus melee damage to drones | Niche enemies |
| Flyswatter | Conditioning | One-hit kill on drones/wasps | Convenience only |
| Crawl Before You Walk | Mobility | Faster crawl when downed | Rarely decisive |
| Downed but Determined | Conditioning | Slower collapse when downed | Minimal impact |
| Gentle Pressure | Conditioning | Less noise while breaching | Limited stealth use |
| Blast Born | Conditioning | Reduced explosion hearing impact | Situational |
| Sturdy Ankles | Mobility | Reduced fall damage | Avoidable |
| Agile Croucher | Survival | Faster crouch movement | Low relevance |
| Looter’s Luck | Survival | Chance for double loot | RNG-based |
| One Raider’s Scraps | Survival | Chance for extra crafted items | Inconsistent |
| Turtle Crawl | Conditioning | Less damage while downed | Delays defeat |
| Suffer in Silence | Survival | Quieter movement while critical | Niche benefit |
In Arc Raiders, stamina and momentum matter more than raw damage.
Prioritising S Tier skills creates a foundation of survivability and efficiency, while A Tier skills allow you to specialise without sacrificing consistency. B Tier skills should only be taken when they directly support a specific strategy.
If your goal is higher extraction success and better loot retention, focus on:
- Stamina regeneration
- Movement efficiency
- Reduced encumbrance
- Faster, safer looting
Those advantages compound—and often determine whether you escape or fall.


